I have been enjoying documenting life with my Heidi Swapp planner.
Rather than using my planner only to pre-plan however, I have been using it to document what has already happened also. It's a great way to keep track of the events I need to remember and the memories of said event too.
My planner is more like a mini version of my Project Life style moments in between album that I haven't touched in quite some time. Everything is just on a smaller scale, with fewer photos.
Each month has 2 inserts like the one you see above. So 4 photos to keep at the beginning of the month or stick into whichever week you'd like. Now that I seem to have less photos on my camera roll, this actually works just fine for me.
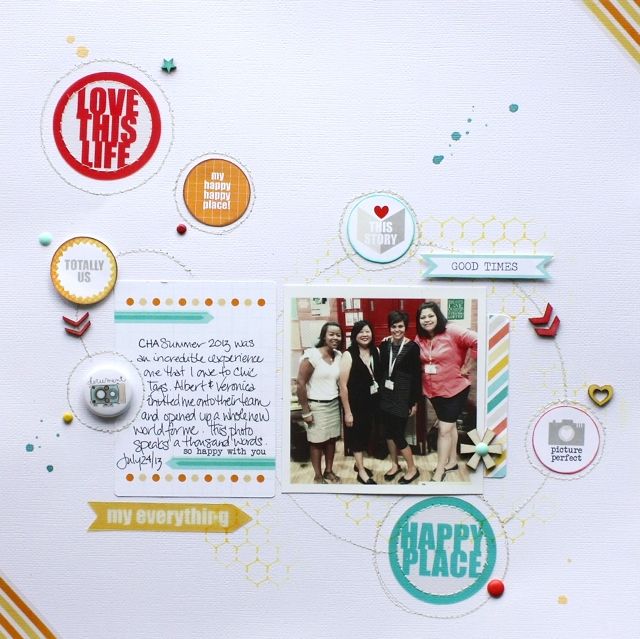
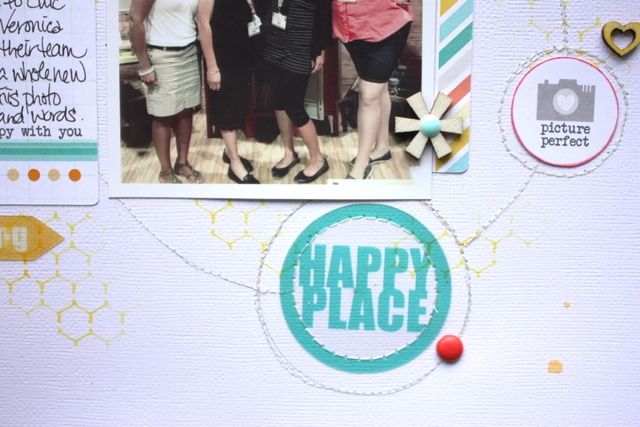
I have really fallen in love with adding bits of embellishments to my planner. It creates a little more bulk than probably is best, but I figure I will deal with it when that time comes. The sentiments you see here are all from the Heidi Swapp Hello Beautiful collection.
If I have more photos that I would like to add I simply insert them into the date portion of the week, or even print them a little larger and fill the opposite box on the page.
As you can see I am not following any strict set of rules, simply flying by the seat of my pants. Some days are pre-planned, and others are simply filled in after the fact. The particular week was filled in the Sunday following the first Sunday of the week. The one thing that has remained consistent thus far is that I choose one paper collection to use on 2 pages, sometimes I go for two weeks using the same collection as I have here, and other times I only use one collection for one week. It pretty much only depends on if I am working ahead or going backwards. If I already have it all out I am more inclined to keep going.
Pretty much everything I have used in my planner is available in the paper Issues store. If you're looking to pick up a few supplies for your planner, or other scrappy needs feel free to use my code at check out to save 20% off everything in your cart.
That's all I have got for you today friends. Thanks for stopping in today!
Pin It
Showing posts with label Heidi Swapp. Show all posts
Wednesday, July 22, 2015
Friday, August 29, 2014
My Graduate
This was my final layout for Chic Tags. I shared this post on their blog a few weeks ago, but never shared it with you all, so thought I would do that today.
I was super pleased with the way this layout turned out. I had a picture in my head, and it actually looks as I had hoped, don't you love when that happens? I wanted to try my hand at a little more messy technique than usual, and had been wanting to scrap this photo of Belle and I the evening of her Grade 9 grad celebration. My baby is growing up so beautifully, sometimes she takes my breath away. This photo is one of those moments.
I have so enjoyed my time with Chic Tags. Albert & Veronica are two of the kindest, most encouraging people you will meet in this industry. They love each of us as designers and most importantly as people, and have been a huge inspiration for me with their innovative and trendy products. I can't thank them enough for allowing me to go on this wonderful adventure with them. I wish them all the best in their endeavors, and want to thank each of you who so faithfully popped in to see how I might inspire you to use Chic Tags products.
Have a wonderful last hoorah before school begins (for some of us anyway) friends, thanks so much for popping in!
Pin It
I was super pleased with the way this layout turned out. I had a picture in my head, and it actually looks as I had hoped, don't you love when that happens? I wanted to try my hand at a little more messy technique than usual, and had been wanting to scrap this photo of Belle and I the evening of her Grade 9 grad celebration. My baby is growing up so beautifully, sometimes she takes my breath away. This photo is one of those moments.
My intention was to use tiny tags to create my photo base, and only colour mists to create my background, rather than patterned paper. Talk about easy, and fun. I started by choosing some of the cards from the Cloud 9 Collection, and one journal card from the Let's Go Collection to act as my base, and ground everything. After that, I simply sprayed some Heidi Swapp Color Shine (in mustard) near the area where I wanted my photo cluster to be, and then dropped some coordinating colours around the outer edges of the yellow. I then took my long narrow date stamp and placed it just off center to the left of the page. From there I placed my yellow journal card to be the base around which everything else was layered.
A few Mini Icon cards scattered around with some coordinating buttons and enamel dots, and my layout was complete.
Mixing in just a touch of gold from the Cloud 9 label stickers, and (last year's) Good Tidings Christmas rub-ons, helped to tie in the the gold glitter alphabets that I knew I wanted to use for my title.
I have so enjoyed my time with Chic Tags. Albert & Veronica are two of the kindest, most encouraging people you will meet in this industry. They love each of us as designers and most importantly as people, and have been a huge inspiration for me with their innovative and trendy products. I can't thank them enough for allowing me to go on this wonderful adventure with them. I wish them all the best in their endeavors, and want to thank each of you who so faithfully popped in to see how I might inspire you to use Chic Tags products.
Have a wonderful last hoorah before school begins (for some of us anyway) friends, thanks so much for popping in!
Pin It
Monday, July 7, 2014
Moments In Between
I'm trucking along with my Moments In Between album, and have another week to share with you today.
I also added a few bits and pieces from a few Paper Issues Swag bags. How cute is that bird clip?! The October Afternoon label maker looking phrase on the top right is also from a Swag Bag. Just like the ephemera packs they are jam packed with product.
In order to fill a few more empty pockets I created a couple of Silhouette cut files a while back. If you're interested you can download them for your personal use here on Dropbox. To get your hands on some of those ephemera packages hop over to the Paper Issues store, and don't forget you save yourself 20% off your entire order by using code:SHERRI.
Thanks for stopping by today friends! Pin It
June 1-7
I focused on using up my Heidi Swapp, and Crate Paper ephemera packs on this week's pages.I also added a few bits and pieces from a few Paper Issues Swag bags. How cute is that bird clip?! The October Afternoon label maker looking phrase on the top right is also from a Swag Bag. Just like the ephemera packs they are jam packed with product.
Thanks for stopping by today friends! Pin It
Monday, June 23, 2014
Ephemera Accents
I decided to challenge myself with my most recent layout created with the Scraptastic June kit. The challenge was to create a layout using zero patterned paper (with the exception of the background sheet), only the add-ons from both kits, and mostly the gorgeous ephemera Heidi Swap, and Crate Paper ephemera pieces.
One of the things I love most about the Crate Paper ephemera pieces is that they are opaque allowing you to use regular adhesive without the adhesive showing through, making them quick and worry free to adhere.
I think the Oh Darling bows are adorable. The bulkiness of them, however scared me from using them on my layout. The solution was simply to remove half of the clip using adhesive on the remaining side and sticking it to the layout that way, problem solved.
Adhering acetate pieces can be tricky. Here I've used a couple different techniques you can see with the butterfly that I've layered the acetate one onto a die cut shape butterfly, allowing me to use regular adhesive once again to adhere it to the page. With the acetate pieces I used brads to adhere them to the page. Efficient, cute, and effective.
These packs were so jam packed with pieces that I have a ton left over, despite using so many on this one layout. I'm hoping to incorporate more of them into my Moments in Between Album.
Thanks for popping in today friends! Pin It
![]() |
Also added some washi tape from the Add-On Kit |
I think the Oh Darling bows are adorable. The bulkiness of them, however scared me from using them on my layout. The solution was simply to remove half of the clip using adhesive on the remaining side and sticking it to the layout that way, problem solved.
Adhering acetate pieces can be tricky. Here I've used a couple different techniques you can see with the butterfly that I've layered the acetate one onto a die cut shape butterfly, allowing me to use regular adhesive once again to adhere it to the page. With the acetate pieces I used brads to adhere them to the page. Efficient, cute, and effective.
These packs were so jam packed with pieces that I have a ton left over, despite using so many on this one layout. I'm hoping to incorporate more of them into my Moments in Between Album.
Thanks for popping in today friends! Pin It
Friday, October 11, 2013
Picture Perfect
Happy Friday Friends!
This week I celebrated my one year anniversary with Chic Tags. And thought it would be fun to document the occasion using our brand new Happy Place Collection, and a photo from my CHA experience.
One of the biggest hits with our new collections is the clear tags. I've used 2 on my layout and adhered them both by holding them in place with just a teeny bit of adhesive, and them sewing around the inner border. Love the way it turned out. I used this idea of "happy" to create the design of my layout. To me, all the circles give the layout a happy feel.
The Happy Place collection includes 8 - 3x4 journaling style cards, perfect for both traditional layouts, and project life style scrapping.
I think my favourite thing about the new collections are these mini icons, and the perforated strips at the bottom of the 12x12 papers. I love the little sayings and sentiments, and the fact that they are pre-set to different styles, like this "good times" one shown here. All I had to do was use some 3D foam dots to pop it off the page, easy peasy.
Hope you've been inspired to create something great today. Come back on Sunday for our next Creative Scrappers reveal. Have a wonderful day friends. Pin It
This week I celebrated my one year anniversary with Chic Tags. And thought it would be fun to document the occasion using our brand new Happy Place Collection, and a photo from my CHA experience.
I was fortunate enough to be able to use some frequent flyer points to fly down to Vegas for the event. It was like a dream come true meeting Veronica in person, and helping out in the booth introducing CHA goes to Chic Tags products, and meeting so many great people from all around the world. An added bonus was meeting fellow DT member Malika and connecting with several Instagram friends in person for the first time, like Chiao Tan pictured here.
The Happy Place collection includes 8 - 3x4 journaling style cards, perfect for both traditional layouts, and project life style scrapping.
I think my favourite thing about the new collections are these mini icons, and the perforated strips at the bottom of the 12x12 papers. I love the little sayings and sentiments, and the fact that they are pre-set to different styles, like this "good times" one shown here. All I had to do was use some 3D foam dots to pop it off the page, easy peasy.
Hope you've been inspired to create something great today. Come back on Sunday for our next Creative Scrappers reveal. Have a wonderful day friends. Pin It
Friday, September 20, 2013
Goodbye Cre8tive Cre8tions
Andrea at Cre8tive Cre8tions has been on busy woman, and with that means not enough time to dedicate to a design team to show off her store product, including paper, stamps, and flair. I have loved my time with her and some super talented women from all around the world. I wish her all the success in the world and am grateful that I will be able to keep up with her adventures through Facebook and Instagram.
I thought that today I would share with you the last of my projects created for her back in June.
Another opportunity come and gone. I will always be grateful to Andrea and Thomas (her hubby and partner in the biz) for giving me the chance to work with their fun products and represent their business.
Thanks for stopping by friends. I hope this weekend brings you rest, and lots of time with the ones you love most. Pin It
I thought that today I would share with you the last of my projects created for her back in June.
![]() |
The other Mr. of our home, using some Pink Paislee and Silhouette cuts. |
![]() |
Some added Chic Tags goodies, and Silhouette cuts here. |
![]() |
All Cre8tive Cre8tions papers with some masking and Silhouette cuts. |
Thanks for stopping by friends. I hope this weekend brings you rest, and lots of time with the ones you love most. Pin It
Wednesday, September 11, 2013
August Colour Suite
Thought I'd share the first of two layouts I had up at the Scrapbook & Cards Today blog last week.
![]() |
This is Angela, one of my dearest friends on this earth. We don't get too many photos together that we both love, so this one we got during our brunch date last month: of course had to be scrapped. |
I used the summery colours of the August Colour Suite Challenge to create this layout.
Lots of layered goodness, of course. I just love the ephemera pack.
The "enjoy" is a Heidi Swapp cut file. That I offset quite a bit, and tinkered with the keep the proportions right in my Silhouette Cameo. I then used 3D foam squares to pop if off the page right on top of the photo.
This layout has quickly become one of my all time favourites. I just love the way the colours, and all the design elements work together so perfectly.
Thanks for stopping by today. Leave me a comment, and I'll be sure to stop by and leave you some love at your corner of the web too.
Pin It
Friday, August 30, 2013
Creating Your Own Resist Paper
The fabulous Miss Heidi Swapp. shared with the world how to create your own resist paper a while back. I gave it a try for myself back then when I discovered it, and thought I'd share with you here how I did it once again for Chic Tags using something as easy and affordable as Mod Podge. I gave it a try a while back, and wanted to let you all in on the secret too.
To begin you'll need the following supplies.
background paper
Mod Podge
mist
sponge brush
a mask
some paper towel
a heat tool for drying
Position your mask onto your background paper, and add a little Mod Podge to a painters palette (or paper plate, or even a scrap piece of cardboard)
Use your brush to spread a thin layer of Mod Podge onto the mask. In my case I wanted to create a resist that was only a touch here, and there. This is what your page will look like once you remove the mask. Cool right? Barely visible, but you can still make out where the resist will be. Now it's time to add the mist to the areas where you've applied the Mod Podge, and remove the excess from on the Mod Podge using paper towel.
This is what your background will look like once you've wiped all the excess mist away.
As I said earlier, I tried this technique a few months ago for the first time, and this was the colour I chose back then. For Chic Tags I created a brand new project and used a different colour to create my resist.
Here is my newly created project, mixing the resist technique and fabulous Chic Tags products.
![]() |
A close up of the resist pattern |
![]() |
Layered goodness to my heart's delight |
![]() |
I placed the Date Tag in a glassine envelope to be able add/hide the journaling. |
There you have it, easey peasy right? I hope you're able to go and try this technique out for yourself. Are there any techniques you've discovered recently that you think are worth sharing? If so, I'd sure love to hear them.
Monday, August 12, 2013
A few layouts
Thought I'd share with you a couple of layouts I haven't yet shared here.
First up is this one I did for the July Sketch Challenge at Scraptastic, using this sketch by Susan.
I used the Out On The Town main kit and Add On kit to create this layout.
Last is this one that I created for the Scraptastic Online Crop last weekend. Thanks so much to those of you who joined the party and played along with me.
Pin It
First up is this one I did for the July Sketch Challenge at Scraptastic, using this sketch by Susan.
I used the Out On The Town main kit and Add On kit to create this layout.
![]() |
I just loved these Fancy Pants papers. |
The second layout is one I put together the other night with a collection that I've had almost completely untouched for 3 summers. It is by far the oldest collection I own. The 100 Days of Summer collection by Simple Stories is was so gorgeous, I actually had a hard time cutting into it, and so it just sat there untouched after only one layout.
![]() |
Feels good to finally put more of it to good use. I plan on using the rest to complete a project life spread. |
Last is this one that I created for the Scraptastic Online Crop last weekend. Thanks so much to those of you who joined the party and played along with me.
Everything here is from the Out On The Town Add On Kit. Lots, and lots of embellishments, very little patterned paper. I seem to be doing that more frequently lately.
There you have it, you're all caught up on what I've been up to in between CHA and getting out to the lake with the girls here and there. I have a crop with a bunch of friends coming up on Saturday. I'm really hoping to get ahead of the game there for September DT projects, giving me more time to catch up on Project Life and get some just for fun layouts in.
Thanks so much for stopping by today friends. I sure appreciate it. I've been making a point to come by and visit all of you too. I love having a little peek into the lives of my scrappy friends.
Happy Monday all!
Pin It
Subscribe to:
Posts (Atom)